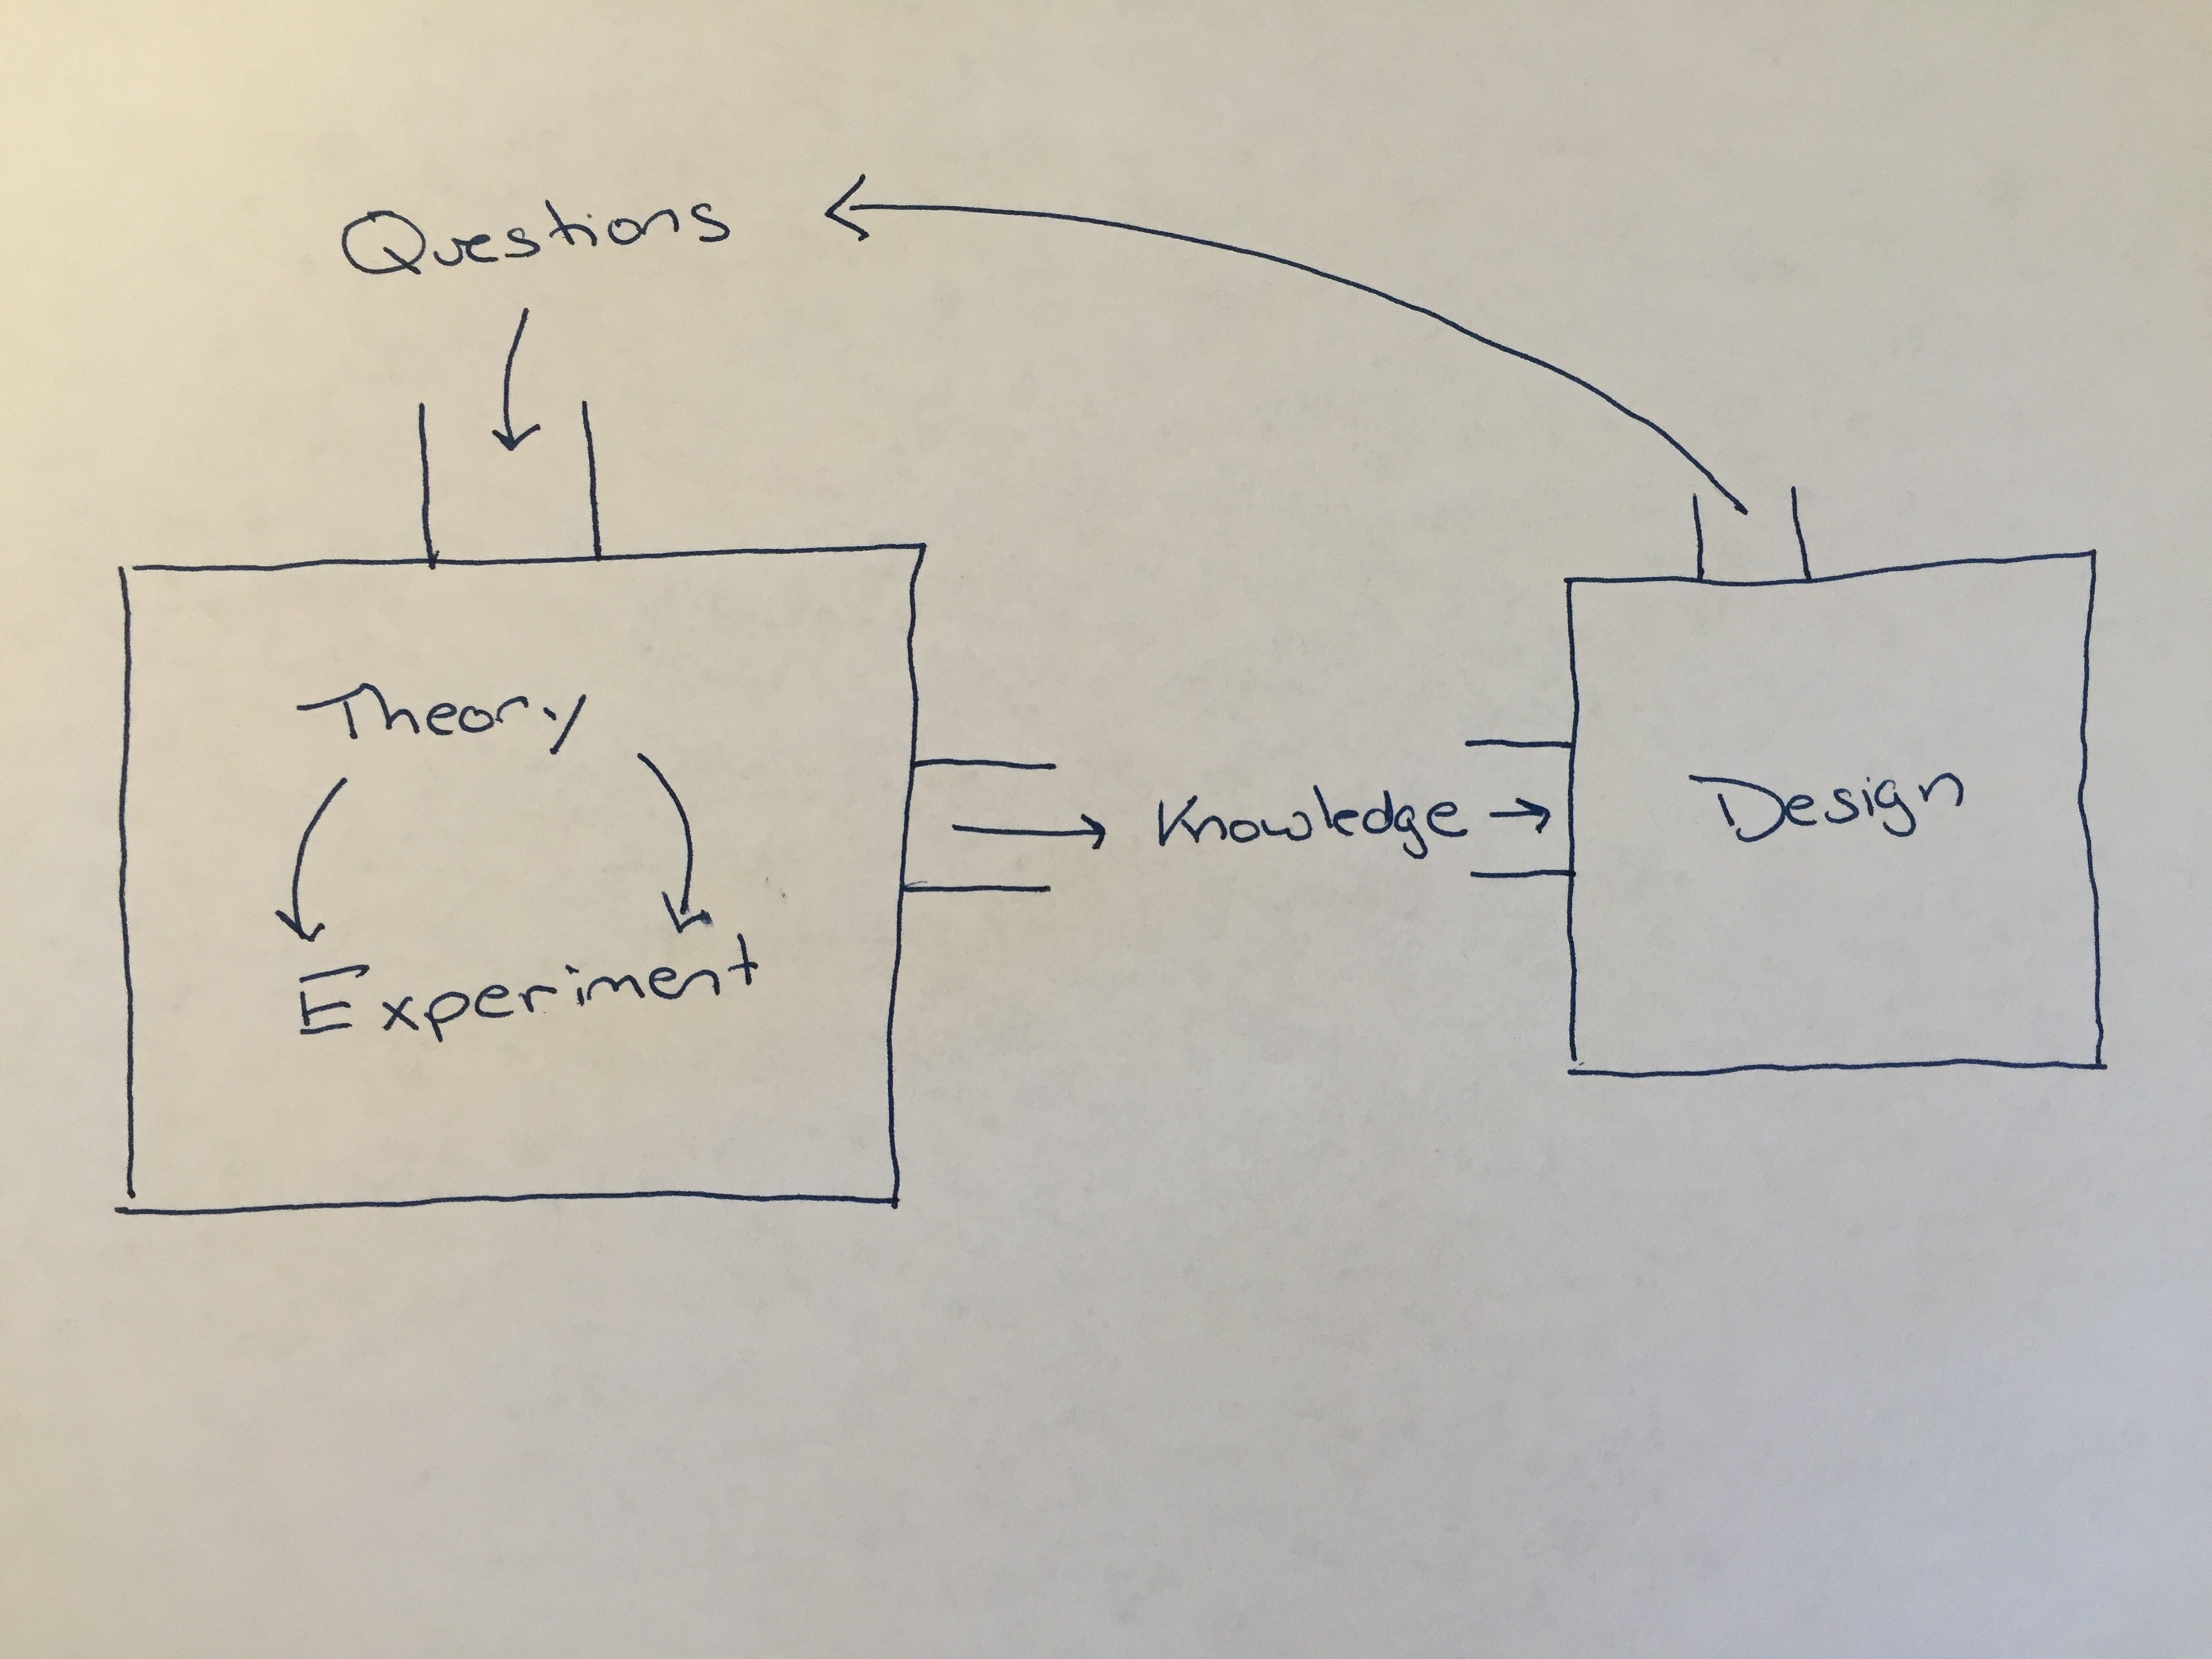
Last time, we talked about the notion of “STEM” and in particular, the notion of “STEM” as a meta-discipline. We discussed the idea of organizing STEM activities around the central practices of theory, experiment, and design, or mathematical modeling, the scientific method, and the practice of engineering design. We put forth the notion that a good, integrated STEM activity, would help students to grasp the interrelationship of science, mathematics, and engineering sketched out in this diagram:
And, I indicated that this time, we’d get concrete, and explore a particular STEM activity. So, today, I want to talk about one such activity and how it might be developed to include all of the elements we discussed last time.
While examining lots of different STEM activities one thing I’ve noticed was the many such activities that are organized around having students build a simple piece of technology. It is remarkable how modern material science and the economies of scale associated with computer manufacture in particular have spawned the modern “Maker Movement” and a inspired a whole new generation of DIY’ers. This has made possible the opportunity for students to design, build, and play with a wider variety of technologies than was possible just twenty years ago. If you haven’t explore this, I encourage you to visit instructables.com and spend a few minutes browsing. It’s a great starting point for inspiration for STEM projects.
For today’s project, I was inspired by the many instructables-based projects around building a speaker. I don’t mean learning how to use an off-the-shelf speaker, or building a case for a speaker, I mean building an audio-speaker from first principles out of wire, paper plates, magnets and such. If you search “speaker” on instructables.com, you’ll find a dozen such projects outlined. Since there was something magical about the idea of plugging my iPhone into something I’d cobbled together out of paper and glue and producing a sound, this sounded like a lot of fun. I was also inspired by the picture I shared last week:
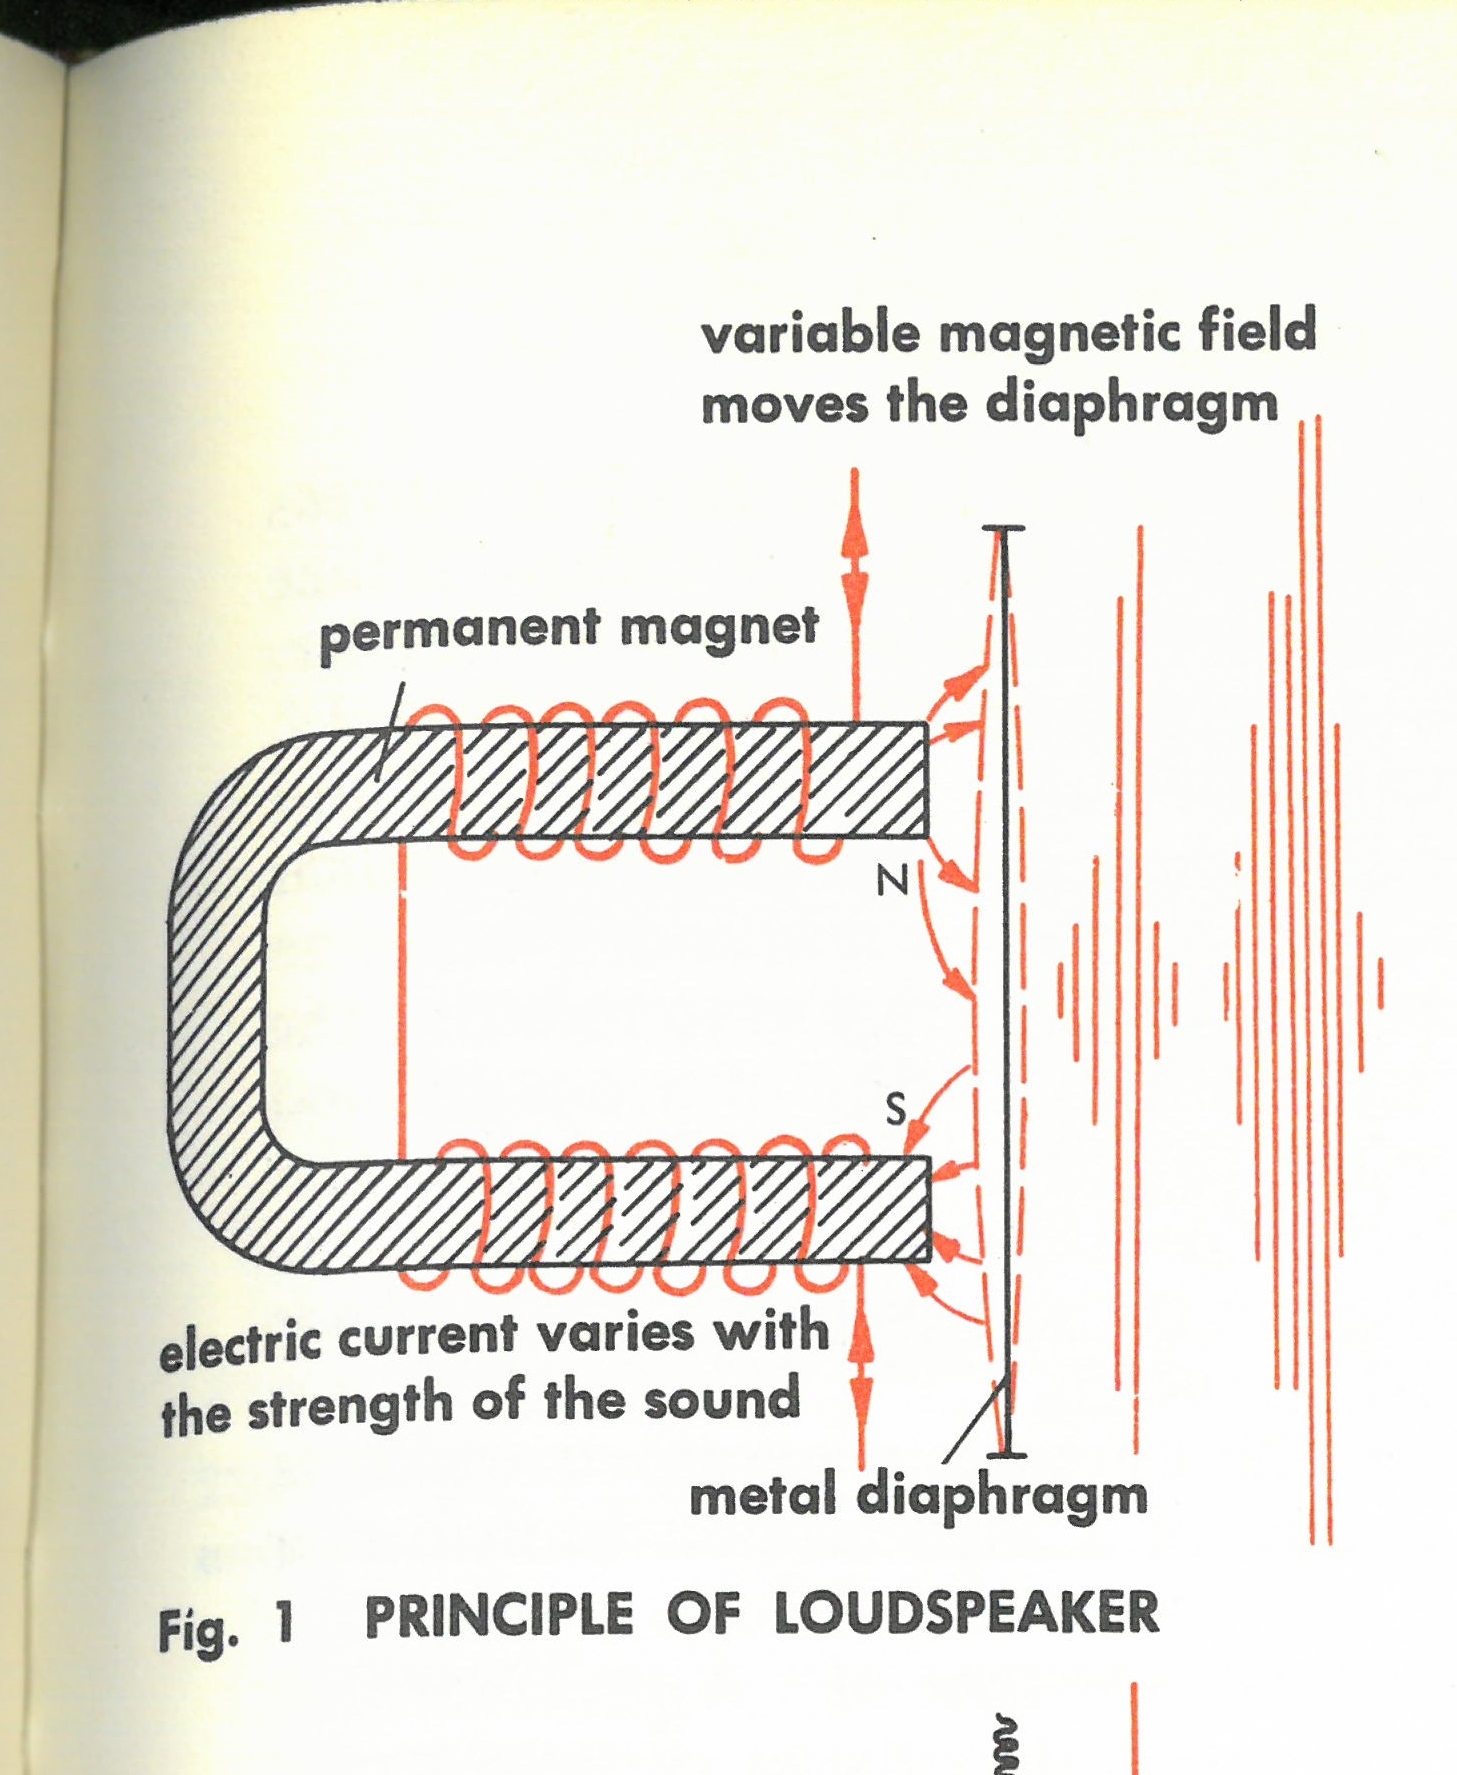
The idea of a speaker is readily grasped from this conceptual model but we note that grasping the idea relies upon understanding a bit of the physical world. In particular, we need to know that an electric current produces a magnetic field, that this field is time-varying with variations in the current, and that sound is a physical disturbance of air. With those pieces of knowledge, we see that a speaker works by taking an electric current that varies with time as the signal and producing from that a physical motion of a membrane that moves air molecules, creating a sound wave. Even with that background and the conceptual model above, there is still likely to be something very abstract for most students about this level of understanding. That’s where, to me, making this hands-on and having them build and experiment with their own speaker has value.
For my own personal challenge, I decided to attempt to build a speaker using nothing that I didn’t already have laying around in the basement. My parts list came down to:
- A plastic drink cup
- Packing tape
- A hot glue gun
- A paper clip
- A small permanent magnet
- A piece of paper
- A few feet of magnet wire
It’s likely that you have all but the last item laying around your workshop. If you make it a habit to save the components from old DVD players or CD players, you’ll also have the magnet wire at hand. If not, you can pick up a spool at Radio Shack for a few dollars at most and have enough to make dozens of speakers.
Here’s the finished speaker:
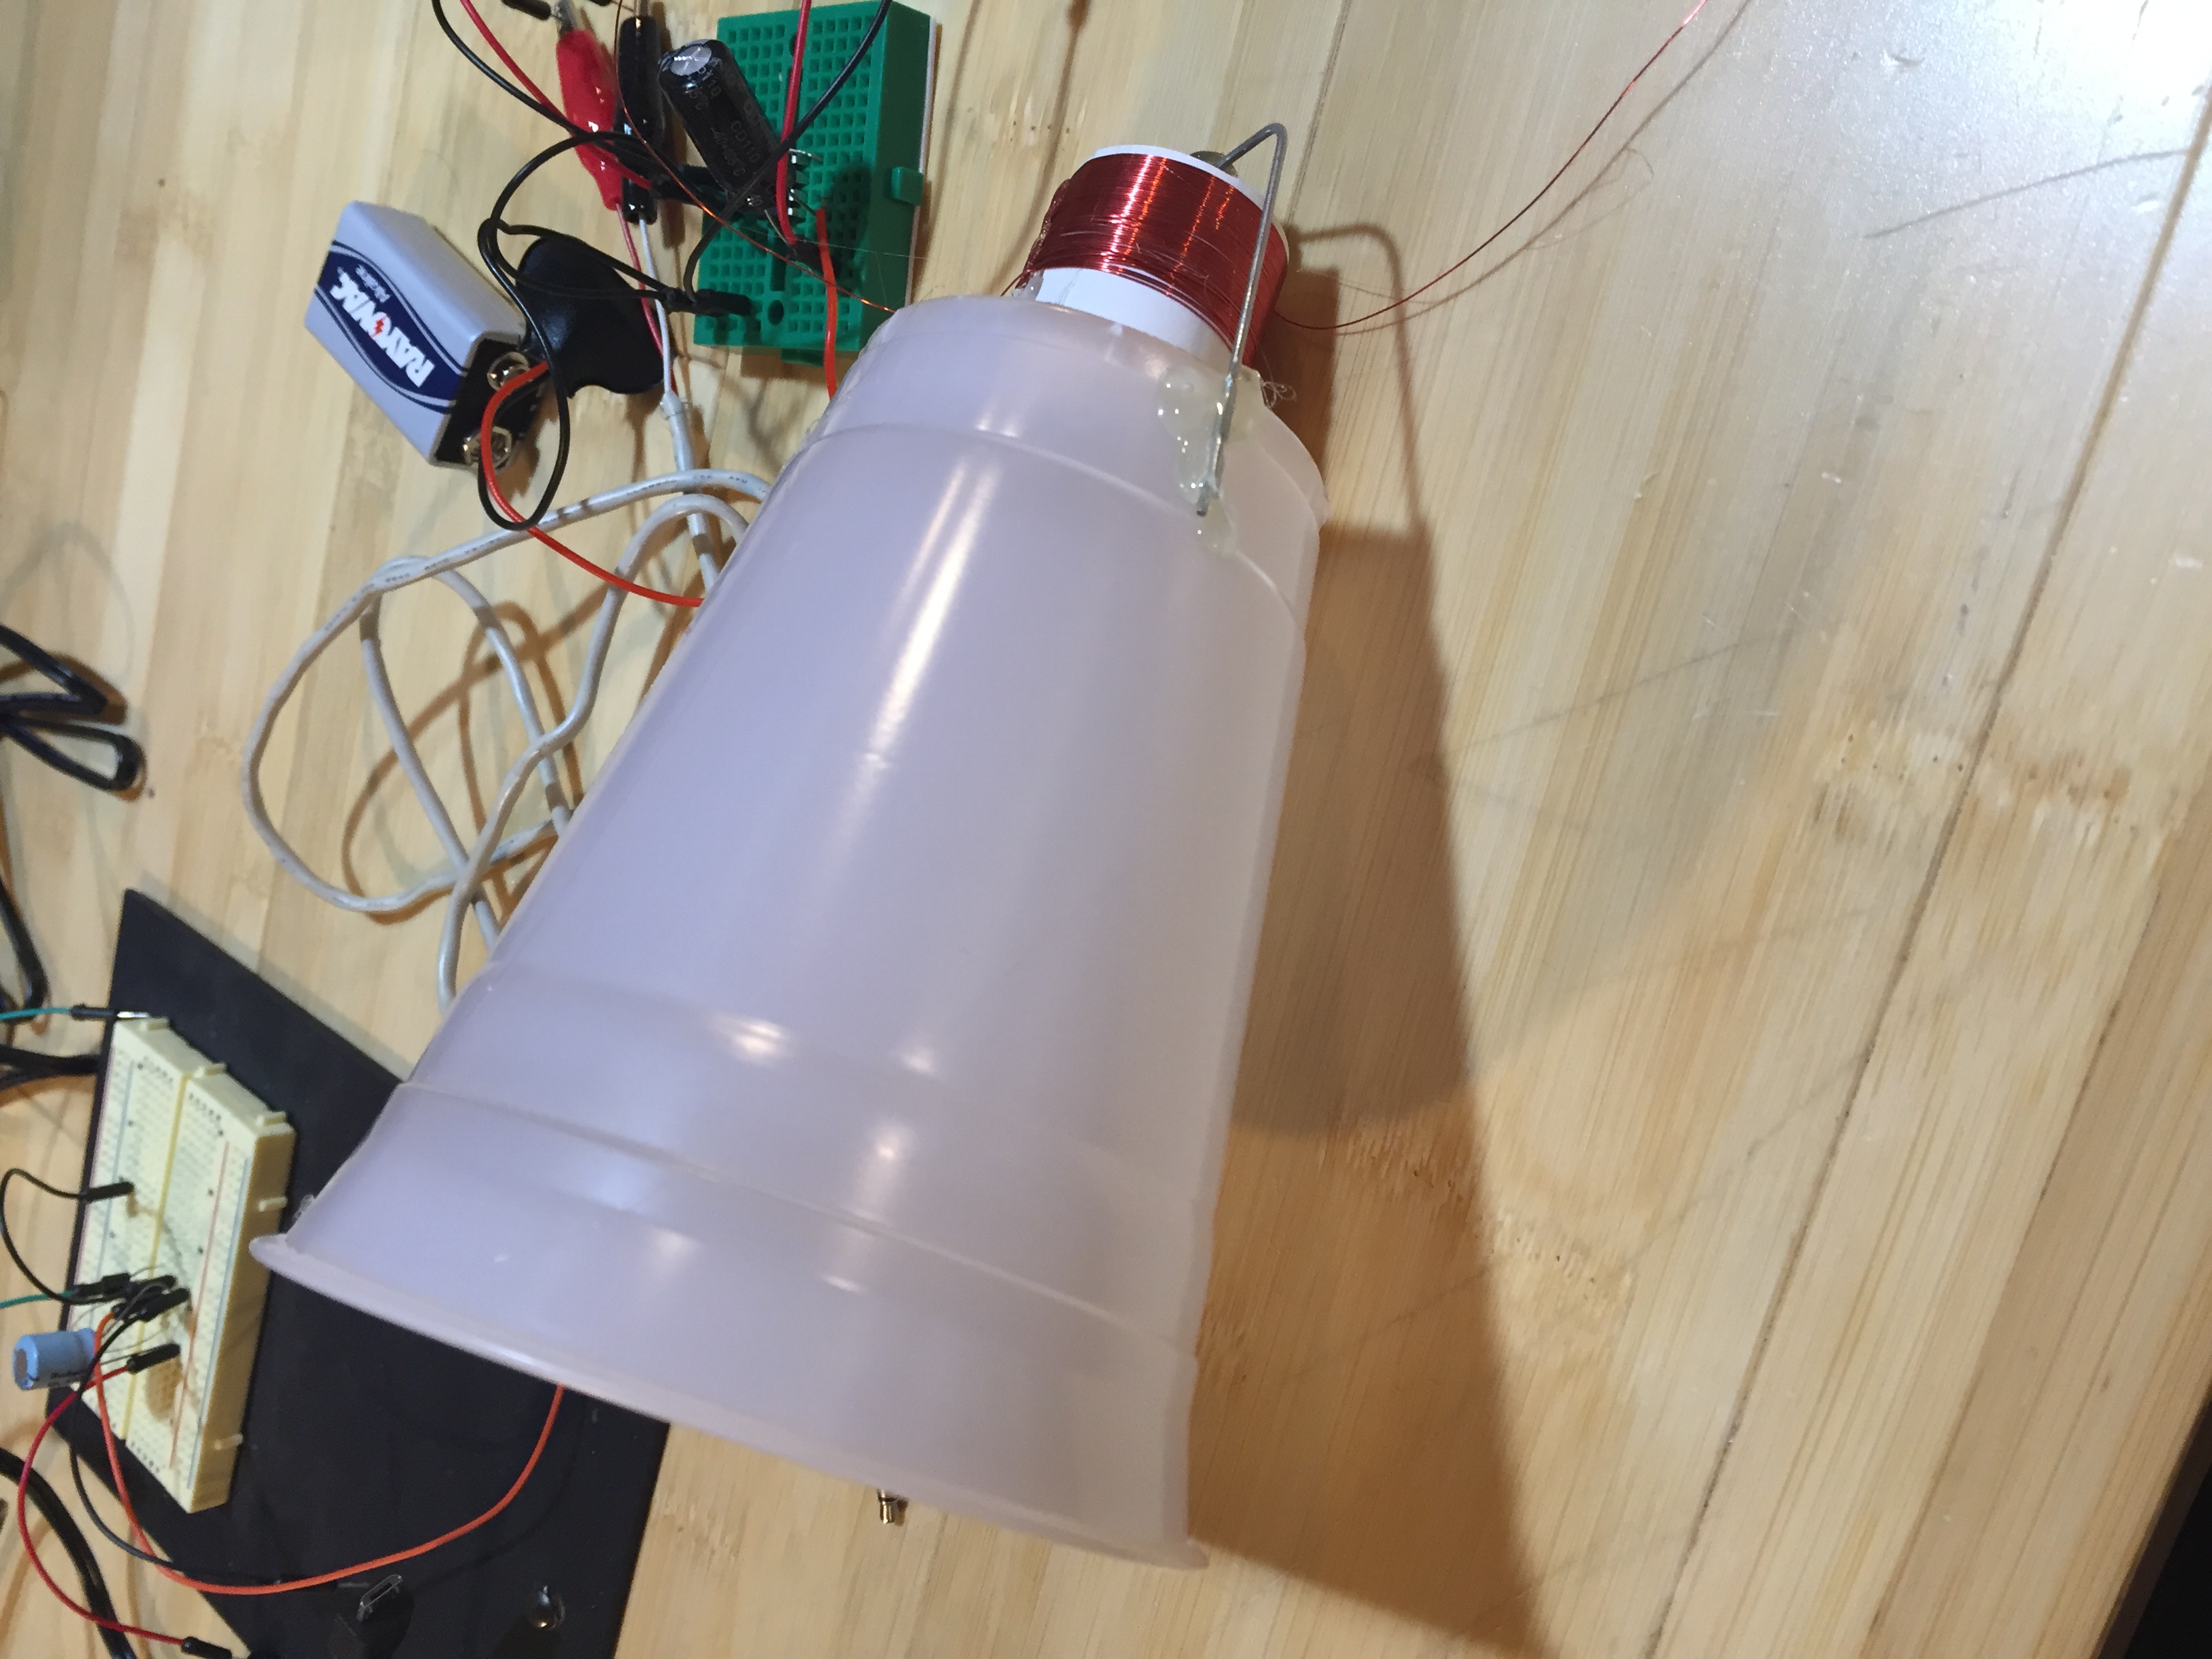
Note that the design is quite simple. I cut a hole in the bottom of the cup and put a piece of packing tape over the hole to serve as the vibrating speaker membrane. I then wound the magnet wire around a tube of paper and glued that tube directly to the membrane. Finally, I bent the paper clip into a U-shape, glued the permanent magnet to the bottom of the U and attached the entire U to the paper cup so that the magnet was suspended inside the paper tube. Voila! Instant speaker. To test, I clipped the earbuds off of an old set, plugged the jack into my iPhone, and attached the bare wires directly to the speaker wires coming off of my paper coil of magnet wire.
There is something magical about hearing sound come out of such a simple contraption. But, the sound was quite difficult to actually hear, so I took one final step and rigged up a quick and dirty amplifier:

For this, I used an LM386 amplifier chip, two capacitors, a 9V battery, and some wire. Running the signal from my iPhone through the amp and then to the speaker I then had a reasonably clear, reasonably loud working speaker. Now, I haven’t given you the most detailed explanation of how to build this speaker or amplifier here, but as I mentioned above, you’ll find dozens of detailed plans on instructables.com. Here, I really want to get back to thinking about this as a typical STEM activity and talk about where you might take this next. Let’s return to our sketch from above:
Thus far, we’ve been working firmly within the “Design” box in this sketch. We’ve take a little knowledge, i.e. the basic principles of how a speaker works, and designed and built a working prototype. I think it is easy to see how we might structure this type of activity for students and have them arrive at this point. Now, notice to get to this point I’ve used no mathematics at all and very little science. This is where we have to be very deliberate about not having this STEM activity end here and where we have to be very deliberate about helping students see a genuine need for the tools of math and science in this project.
How do we do that? We don’t want to “tack on” some extra math and science. It’s precisely at this point that we want our students to feel that genuine need and to feel compelled and driven to pull out tools like mathematical modeling. Here, and in many cases, I think you can achieve this by asking one simple question – how do we make it better? Now that we’ve got a working prototype of a speaker, how do we improve our design? If you push just a little bit on this point, you’re quickly out of the “Design” box and back to “Questions” that you need mathematical modeling and science to answer. Here’s a few such questions that you might encourage your students to investigate next:
How does the volume of the speaker depend on the number of turns in my wire coil? If I’m going to manufacture these, I’d like to use as little wire as possible, but not too little! Can I build a mathematical model that relates turns to the amplitude of sound?
To test the quality of a speaker, one typically maps out the frequency-response curve of the speaker. That is, as an input we put in pure sinusoidal signals of different frequency, but the same amplitude. We then measure the intensity of the sound coming from the speaker. If we sketched such a curve (experimentally perhaps) for our speaker, what would it look like? Could we build a mathematical model that predicted the shape of this curve and related that shape to the physical properties of our speaker?
The radius of our magnet coil was chosen so that the permanent magnet would fit nicely inside the coil. How would the performance of the speaker vary if we used a different magnet or a different coil? Can we build a mathematical model that related speaker performance to these coil properties?
I imagine that once you start thinking this way, you’ll be generating many such questions and I encourage you to stop at this point in a STEM activity and have your students generate their own such questions. These questions have now led them back into that “Theory – Experiment” box where mathematical modeling is a central tool and opened up multiple opportunities for your students to use their modeling skills in a way that is genuinely motivated by a problem they care about. As they build and analyze their models, the new knowledge they gain should then influence the next iteration of their design. If you can get your students moving through this big loop, Questions – Theory – Experiment – Knowledge – Design, then you’ve got them doing STEM rather than “S-T-E-M.” Good luck! I look forward to hearing about your STEM activities!
John